If you’re like me and like to carry a travel guidebook along for reference on your travels, you know how heavy and annoying they can sometimes become, especially when you’re carrying large guides with information that’s not applicable to your specific trip.
Maybe you’ve purchased with a large “Shoestring” guide that covers multiple countries, but you’re only visiting a portion of the region in the book. Maybe you’re visiting a selection of a large country that has a correspondingly large guidebook. Either way, you should make it a goal to eliminate unwanted guidebook pages, and thus bulk and weight from your pack and daybag.
I’m not particularly “crafty” in the traditional sense, but have worked out a quick and easy way to rebind a guidebook into smaller, lighter sections that can be done with minimal resources and ability. I’d budget about an hour for the entire process.
WHAT YOU’LL NEED:
- a travel guidebook
- one razor knife
- a roll of 2″ wide gaffer’s tape (cloth tape). Any color will do.
- a roll of 2″ wide clear packing tape
- pieces of non-corrugated cardboard. Beer boxes, the backs of legal pads, anything like that.
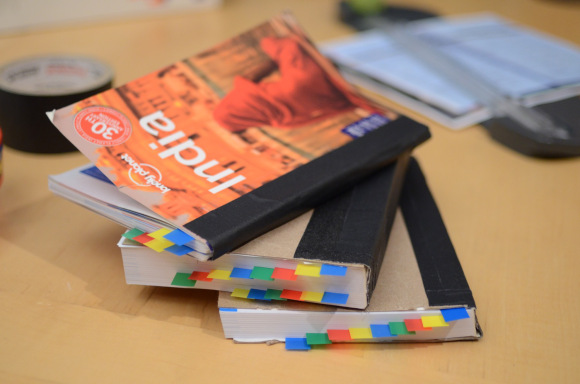
One of the guidebooks I’ve rebound is The Lonely Planet India guidebook (14th edition, Sept 2011). As India’s quite a large country, the guidebook is fairly monstrous and unwieldy.
- Dimensions: 7 inches long, 5 inches wide, 2 inches thick (1232 pages)
- Weight: 0.98 kg / 2.16 lbs
That’s a big book, and I don’t want to carry the whole leaden thing along for my entire trip – not in my backpack, not in my daybag either. So I cut through the binding, removed unnecessary pages/weight and made the book into a more manageable three-volume series.
HERE’S HOW I REBIND!
PLAN YOUR CUTS.
Before you slice into a guidebook’s binding, identify exactly what book sections you need to bring along, and what sections are extraneous. Maybe you just need one city’s worth of information. Maybe two provinces. Maybe three countries out of a “shoestring” guide. Identify your needs and note the pages on which they start and end. These start/end points will be the places you will cut the book’s binding.
I decided I wanted to keep the informational guide in the front of the India guidebook as well as the index in the back, plus sections on north and south India. Accordingly, I made cuts at the following points:
- Between pages 52 / 53
- Between pages 668 / 669
- Between pages 1078 / 1079
This gave me five total mini-sections of pages, which I planned to rebind into three separate books.
- Page 1-52 + page 1079-1232. This is the front and back of the the Lonely Planet – a thin amalgam of the table of contents, various feature articles, language guide and index. I’ll carry this with me constantly, and add #2 or #3 as geographically appropriate.
- Pages 53-668. This portion details northern India (loosely speaking). Delhi, Rajasthan, Jammu & Kashmir, Kolkata & Bengal, etc.
- Pages 669-1078. This section addresses my potential route through the southwest and south. Mumbai, Goa, Maharashtra, Karnataka, Kerala, Tamil Nadu, Andaman Islands, etc.
NOW YOU’RE READY TO MAKE YOUR CUTS.
Use your razor knife to slice as cleanly as possible at your predetermined points. Chances are that certain pages near your cut will start to fall out now that their binding is no longer intact. No worries – just stack them back on top of their corresponding pages and tape them back in with clear packing tape as needed (sometimes this will require page-to-page taping). If your cut was fairly clean, you should only have to do this to a few pages in your new mini-sections of the guidebook.
APPLY A NEW INTERNAL “BINDING” TO THE OUTSIDE OF EACH MIN-SECTION WITH CLEAR PACKING TAPE..
I had five mini-guidebooks per my notes above, and each got its own packing tape binding. One layer will generally do. This’ll strengthen your end product.
CUT YOUR CARDBOARD SHEETS INTO “COVERS” FOR YOUR NEW MINI-BOOK(S).
I used the razor knife to cut six 7″ x 5″ sheets of plain cardboard, corresponding to the six exposed front/back pages of my three resulting volumes. Placing cardboard on the front and back pages of each gives the new mini-books a bit of protection for the pages within as well as stiffness which helps with your book’s readability.
PLACE THE CARDBOARD SHEETS ON THE FRONT AND BACK OF EACH MINI-BOOK AND TAPE THEM ON.
Use another strip of clear packing tape on the inside “cover” of each book to adhere the pages to the cardboard cover. Then apply a top-to-bottom strip of cloth gaffer’s tape along the outside of the binding to finalize. Cloth tape flexes nicely and should hold up through opening and closing the guidebook throughout your trip.
TRASH OR SHELVE THE PAGES THAT DIDN’T MAKE THE CUT.
Who knows, you might want to reference them later.
You’re done! Enjoy your newly bound, smaller, lighter, unassuming travel guidebook(s).
**Footnote on durability: I’m proud to say that all three of my self-bound India guidebooks held up through a rigorous three-month trip throughout the subcontinent. This process really works!


Great idea. My lonely planet was the first thing I ditched when I tried to make a lighter bag. I am sure I made a happy camper out of the next person who stayed in that hostel. Wikitravel ended up being my best travel companion.
Here I am, responding a year later. I’m definitely still a guidebook-lugger as much for bits of cultural insight and history as the travel tips, but yeah – cutting out unnecessary paper weight is so key. After I posted this, a friend of mine offered up her professional rebinding services for future weight-reduction. Now my revised guidebooks are light AND pretty! Thanks for reading, Liz.